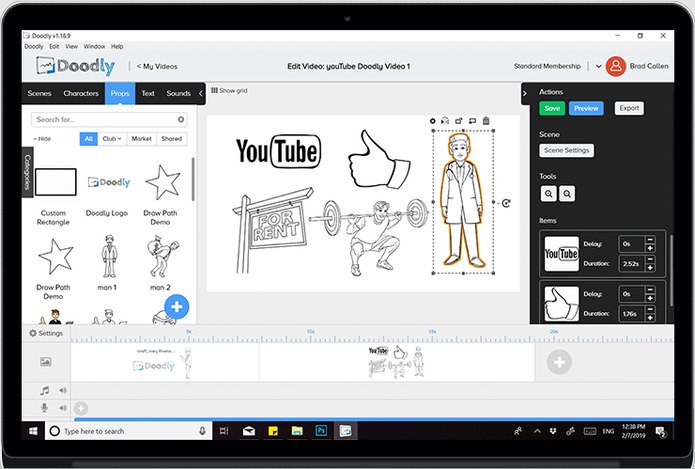
Doodly is an animation software with variety of boards designs like whiteboard greboard chalk and galss board. It also have an custom design mode that allow you to choose the colour of your own interest. But for those who are struggling with this software and do not know how to use it. Simply follow hte below steps and you will be able to create your first ever animation on doodly.
- After signing at doodle, the first page you see will be my videos page. Click on the create a new video option.
- After that here comes a small tab on which selects the background style, resolution of the video ( you can do it now or later in the video while exporting or saving it).
- After doing it, software will take you to the video interface ( bland video).
- The main thing for animating a video on doddly is to have a script for your video. With very clear steps that will highlight what characters and portraits you will use in every section of your video.
- Then on your left side there will be a bar displaying 5 icons i.e. portraits, characters, text, music or store.
- Go to the portrait section and select the correct sketch for your video from these pre-made sketches.
- Let’s assume we are making a short clip on freelancing. So I will look for the character working on his laptop in his office. Then I will select the dollar sign from the icon settings.
- Make things clear that your access to different characters depend on your doodly subscription i.e. standard plan or enterprise plan.
- Next , as we are drawing a sketch on freelancing, I want to use this text in a video. Simply on the left side of your panel select text, its font and write your word or sentence whatever on the toolbar.
- You can also change the text colour by right clicking on it.
- Next, if you want to upload images from your documents. Click on the character or portrait icon. Select the plus + icon there. Browse your file name it and it will start appearing in your doodly media.
Then just drag and drop it and it’s done.
If you want to colour your drawings there are basically 3 options:
1. Use doodly rainbow ( paid extension in doodly)
2. Drag and drop from your gallery.
3. Colour your text or create an outline of your character. - Now let’s figure out the basic settings of this video interface:
- At the bottom line you have your timeline or on the left side of your laptop there is a voice recorder icon.
- Pro Tip: Try to record the voice for your video first and then make animation according to it. It will save a lot of time and struggle of editing your video and jotting it with voice.
- At the right side, there will be the action panel. Here all your characters will display according to their exhibiting order in a video. The one which will sketch first is at the top or vice versa.
- Now you can change the position ( forward or backward), appearing time of your objects or characters by using these buttons. Like the one you need to reveal first, drag it to the top.
- Next to them you will see a delay and duration option that reflect time. It means the time between the time difference between appearance of your two characters like if it shows 0 sec at delay it means immediately after your first character is drawn your next character will appear automatically. Then there is a duration: how long you want that portrait to stay there.
- To change the size of the character or portrait just right click it and drag it to zoom in or zoom out from the corner.
- Next comes the video settings, here select the hand you want to use in the scene.
- Then select at which direction you want the scene to start i.e rightward, leftward, downward, upward etc.
- Also you can also change your Resolution or whiteboard selection there.
- Enable or disable your subtitles enablement or choose an appropriate eraser mode.
- Furthermore If you want to add music select it from the doodly music gallery or add your own by drag and drop method. It’s done. Congratulations you have successfully created your first animated video.
- For more bland videos click at bottom line and you will have countless ones to complete your video.
- Repeat the same steps at every video section.
- Once you are done you can watch the preview and also adjust the timing to make it fast or slow.
CONCLUSION
Doodly seems hard or confusing at the beginning, but learn it slowly and continuously. Instead of quitting, try these steps again and again and you will be enabled to master this software successfully.


